|
Click on the "click here"
... and it will provide additional info!
Visit my blog: more about assets, shaders, game projects and scripts!
[ + toggle all info fields ]
click here
L |
Tactical Combat Diver
Rendering with my own shader in 3ds max 2010.
Used maps are: diffuse, normal, specular (rgb) gloss(a), sss, cubemap.
Size of base textures: 2048^2
|
R |
This character should fit into some near future Arma3 like universe where he would operate over and under water in close quarters.
|
click here
L |
Sculpting was done in ZBrush. I removed many of the material details (straps) and stitches and instead implemented them later in Photoshop.
|
R |
Triangles body: 10976
Triangles facial hair: 458
|
click here
L |
Nikos Older Brother
Triangles: 5884
Texture size: 2048^2
|
R |
Custom model for Gta4. Rendered in 3ds max 2010.
I wrote an maxscript exporter for the community open file format to get the tangents correct ingame.
|
click here
L |
The Varlach
This model was made for the Dominance War III.
It placed 13th of 1680 participants.
8997 tris - all
2048x2048 texture (alpha, diffuse, normalmap, specular, gloss)
show all pictures
|
R+L |
DarFly
This model was made for the 2nd Dominance War.
It placed 9th from 664 participants.
5302 tris - body
884 tris - gun
2048x2048 texture (alpha, diffuse, normalmap, specular, gloss,
glow)
show all pictures
|
click here
L |
The "Varlach" character
ran through several design stages.
The different concept steps leading to the final base design
from where the first modeling process starts.
show all pictures
|
R |
At the bottom you can see on of the various concept sheets.
Even if the head looks quite simple, many different versions
where drawn first, to nail the wanted look.
The image on the right shows two different head versions worked
out in ZBrush.
The big image shows the lowpoly with applied normalmap and
baked AO.
|
click here
L |
Designing the wings and the head
of the "DarFly" character.
show all pictures
|
R |
Zomby soldier
1314 tris - body | 256x512 diffuse texture
| 196 tris - helmet | 128x128 diffuse texture
Alien Jedi
1472 tris | 512x512 diffuse texture
Power suite
680 tris | 512x512 diffuse texture
Battlemechs
The picture is an in-game screenshot from Mechcommander 2, where I'm using them as custom models.
The mechs below are animated and designed by me.
1284 tris | 256x256 diffuse texture | animation
length: 30 frames - 24fps
show animated gifs
1048 tris | 128x128 diffuse texture | animation
length: 30 frames - 24fps
|
click here
L |
The diorama was created in the CryENGINE 3 Free SDK.
Everything except the car wrecks and the fire particle effect is done by me.
Lower right: this picture is a fake advertisement for a MechWarrior Online hero mech. Was quite fun to make ;) |
R |
Pine tree: 1470 triangles and one 512x512 for the trunk and one 512x512 for the branches.
Fir tree: 324 triangles and one 256x256 texture.
|
click here
L |
VOX:
I've created this model because I wanted to work on some human
proportions, after all these creatures for the DominaceWars.
Also I wanted to create a character who's carrying a lot of
equipment.
So I could experiment with different texture techniques to
create the look of the different Materials. I'm also using
my own shader here.
11114 tris - all
1024x1024 body texture (diffuse, normalmap, specular, gloss)
1024x1024 props texture (alpha, diffuse, normalmap, specular,
gloss)
show all pictures
|
R |
With the "VOX" character I've
tried the "down-shrinking" of a normalmapped model
to a lower polycount and reduced texture size.
This model uses only 3846 triangles for everything and a 512x512
diffuse texture - compared to the 11114 tris and 1024x2048
texture of the normalmapped version.
|
click here
L |
Wires of the normalmapped and
the diffuse map only model
show all pictures
|
R |
The finished highpoly Model of
the "VOX" character.
The lower left image shows the baked normal map with AO and
simple colours.
|
click here
L |
The "VOX" character
was converted to a "very lowpoly" version.
Also the Textures where baked down to a smaller texture with
some uv adjustments.
The lower picture row shows the workflow from the first bake
to the final texture.
show all pictures
|
R |
Sketches where used to get a general
idea of the model and the paint over concept helps to define
all the tiny details while modeling the base mesh.
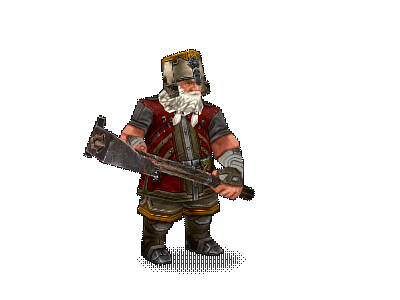
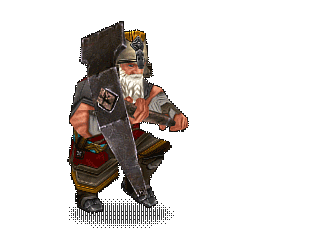
|
click here
L |
The Dwarf is roughly based on a sketch by minze. Check out his fantastic work!
806 triangles for the dwarf body + 92 for the beard and 52 for the helmet.
60 triangles for the pickaxe and
106 triangles for the bomb.
Triangles total: 1116.
One hand painted 512x512 texture for the dwarf, one 256x128 for the beard and a 256x256 for the helmet .
For the pickaxe and the bomb together one 256x256 with some space left for more items
Animations
They are meant to be viewed from distance and from above. So I didn't spend more time on them.
But I like them enough to show them here in closeup.
show animated gifs
|
R |
Dr. Oct the hero of the puzzle game octolab
He's using 808 triangles for the body and 484 for the backpack.
Body and backpack using each one hand painted 512x512 texture.
|
click here
L |
This is my 2nd Fallout3 custom
model. Here I've tried to match the style of the game and
design a retro scifi suit. I call this group of scientist
"New America" because they try to reestablish America
based on their scientific research.
The basemesh was done in max.
show all pictures |
R |
Highpoly - shot from Zbrush |
click here
L |
Screengrab of the lowpoly with
textures in max 2010.
show all pictures |
R |
7476 tris - all
1024x1024 texture (diffuse, normalmap, specular) |
click here
L |
This environment practice is based
on a concept of an public art test, provided by Splash Damage.
show all pictures
|
R |
This model is my personal custom
model for Team Fortress 2.
It's completely functional in-game and ready for online playing.
5874 tris - all
textures: 1024x1024 (body) + 1024x512 (gear) / diffuse (50%
smaller: specular-, exponent- and normalmap )
|
click here
L+R |
Tak:
This model was some kind of a test for mixing several clichés
into one character.
He should look familiar but also unique.
Mixing clichés is a very useful technique for this
purpose.
show all pictures |
L+R |
I'm using here my custom made
"toon" and fur shader, both build with shaderFX.
You can find the shader here.
13402 tris - all
1024x1024 body texture (diffuse, normalmap, specular, gloss)
1024x1024 props texture (diffuse, normalmap, specular, gloss)
512x512 props2 texture (alpha, diffuse, normalmap, specular,
gloss)
|
click here
L |
Different production images from
the "Tak" Character.
show all pictures
|
R |
The wireframe shot.
Note: The fur ist generated by a fur shader. That's why you
can't see the wires there.
|
click here
L |
Here are a bunch of lowres models
I did for various games as custom models for myself. |
R |
My first model I created to plug
into Fallout3, a really great game. Concept was thumb sketching.
The character is a cyborg who was once a normal human but
got injured by radiation. A vaults medlab was able to recreate
him. |
click here
L |
Zbrush shots from the highpoly model.
show all pictures |
R |
3ds max screengrab and on the
right an ingame shot of the model.
9918 tris - all
1024x1024 texture (diffuse, normalmap, specular) |
Till Maginot rigging & animation reel from t&m maginot on Vimeo.
|
|